How to Repair Car Headlights in UAE: A Complete Step-by-Step Guide
Clear and working headlights are important for safe driving, especially at night and during dusty or foggy conditions in the UAE. Over time, heat, sunlight, sand, and road dust can damage headlight lenses and reduce their brightness. Even a small headlight problem can make it harder to see the road and notice other vehicles.
To repair car headlights, first check whether the problem comes from a cloudy lens, a damaged bulb, loose wiring, or moisture inside the headlight. Clean the lens and use a headlight restoration kit if it is yellow or foggy.
Replace a faulty bulb with the correct type if the light is not working. If the headlight has broken parts, damaged wiring, or water inside, arrange a suitable repair or replacement. Finally, test both headlights to make sure they work correctly and point in the right direction.
In the UAE, regular headlight checks are especially useful because high temperatures and strong UV rays can speed up lens damage. Understanding common headlight problems and how to fix them can help improve visibility, prevent further damage, and make night driving safer.
Why Do Car Headlights Get Damaged in the UAE?
The UAE's climate can affect car headlights in several ways. Most modern headlights have clear plastic lenses, often made from polycarbonate. These lenses are usually protected by a UV-resistant coating, but long exposure to sunlight can wear down this layer.
Sand, dust, road debris, and high temperatures can also affect the lens and its surrounding parts. Over time, the lens may turn yellow, become cloudy, or develop scratches.
Moisture can enter through damaged seals, while vibration and ageing may affect bulbs and electrical connections.
Common reasons for headlight damage include:
- UV exposure: Strong sunlight can cause the lens to fade and turn yellow.
- Extreme heat: High temperatures can place stress on plastic parts, seals, and electrical components.
- Sand and dust: Small particles can scratch the lens and reduce light output.
- Water entry: Damaged seals or cracks can allow moisture inside the headlight.
- Electrical faults: Loose wiring, blown fuses, and damaged connectors can stop headlights from working.
- Age and wear: Old bulbs and worn components may reduce brightness or fail.
Regular checks can help identify these problems before they affect visibility.
Common Car Headlight Problems and Their Signs
Before repairing a headlight, identify the exact problem. Different issues need different solutions, and replacing a bulb will not fix a cloudy lens or damaged wiring.
1. Cloudy or Yellow Headlight Lenses
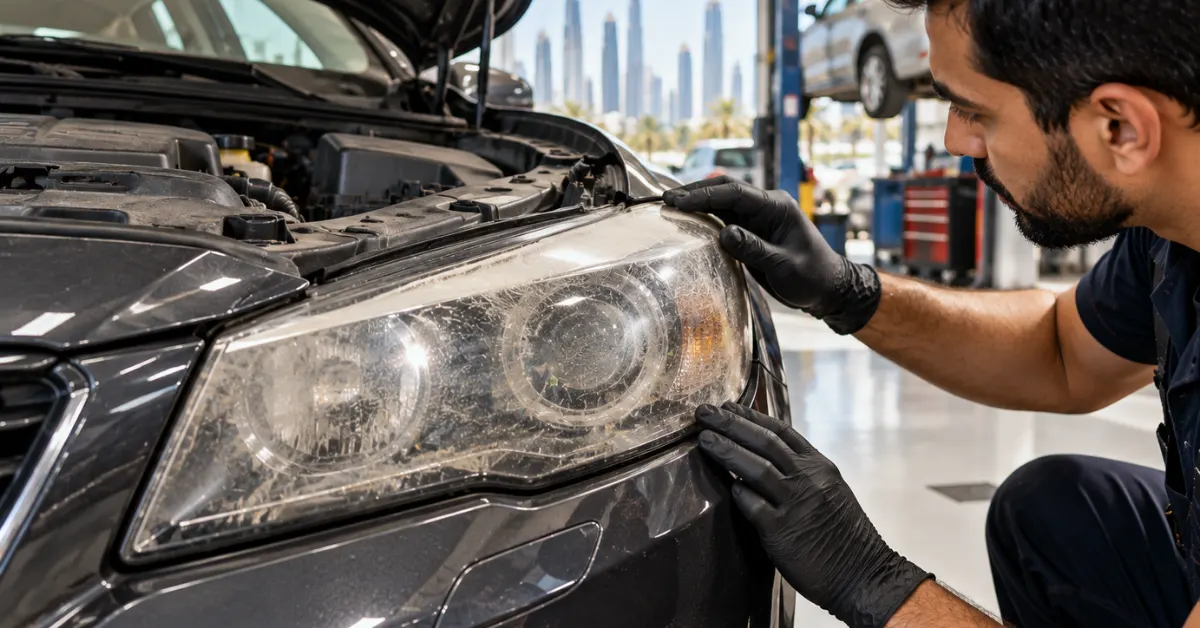
Cloudy headlights are common in vehicles that spend long hours outdoors. The protective coating on the lens can wear away due to sunlight, heat, and exposure to the environment. This causes oxidation, which makes the lens look yellow or hazy.
Cloudy lenses can reduce the amount of light passing through the headlight. A restoration kit may help remove surface oxidation and improve clarity. However, deeply damaged lenses may need professional restoration or replacement.
2. Dim or Flickering Headlights
Dim headlights may be caused by old bulbs, dirty lenses, poor electrical connections, or charging system problems. Flickering can point to loose wiring, a damaged connector, or an issue with the vehicle's electrical supply.
If both headlights are dim, the problem may be related to the battery, alternator, or electrical system. If only one headlight is affected, check its bulb and connections first. A proper inspection helps avoid replacing parts that are still working.
3. Broken or Cracked Headlight Lenses
A headlight lens can crack after a stone impact, minor collision, or other physical damage. Even a small crack can allow water and dirt to enter the headlight assembly.
Some minor external damage may be repairable, depending on the lens material and the location of the crack. However, a severely cracked or broken lens usually requires replacement of the lens or the complete headlight unit. Applying ordinary glue is not a reliable repair method.
4. Moisture Inside the Headlight
Small amounts of temporary condensation may appear inside some headlights due to temperature changes. This can disappear after the lights are switched on or the weather changes.
However, large water droplets, standing water, or moisture that remains for a long time may indicate a damaged seal, vent, or cracked lens. Water inside the assembly can damage bulbs, connectors, and other electrical parts. The cause of the moisture should be fixed rather than simply drying the headlight.
Tools and Materials Needed for Headlight Repair
The tools you need depend on the type of headlight problem. A cloudy lens requires different materials from a faulty bulb or a damaged electrical connection.
For basic headlight restoration, you may need:
- Headlight restoration kit: Contains products designed to remove oxidation and restore lens clarity.
- Microfiber cloths: Help clean and polish the lens without causing unnecessary scratches.
- Masking tape: Protects the paint around the headlight during sanding and polishing.
- Fine-grit sandpaper: Removes damaged surface oxidation when required by the restoration process.
- Headlight polish: Helps improve the clarity of the lens.
- UV-resistant sealant: Protects the restored surface from further UV damage.
- Protective gloves and safety glasses: Help protect your skin and eyes during the repair.
For bulb replacement, you may also need the correct replacement bulb and basic hand tools. Always check your vehicle's manual before removing headlight components.
How to Repair Car Headlights in UAE Step by Step
The right repair method depends on whether the headlight has a cloudy lens, a faulty bulb, or an electrical problem. Before starting, park the car in a safe, shaded area and switch off the engine and lights. Let the headlights cool down before touching them.
Step 1: Inspect the Headlights
Start by checking both headlights for visible damage. Look for yellowing, scratches, cracks, moisture, and loose parts. Switch on the low beams and high beams to check whether both sides are working properly.
If one headlight is dim or flickering, the problem may be electrical or related to the bulb. If both lights appear cloudy, the lenses may need restoration.
Check the owner's manual for any special instructions before removing parts. Identifying the problem first can save time and prevent unnecessary repairs.
Step 2: Clean the Headlight Lenses
If the lenses are dirty, clean them with car shampoo or a suitable automotive cleaner. Use a microfiber cloth to remove dust, sand, and road grime. Rinse the surface if the cleaner requires it, then dry it completely.
Cleaning helps you see whether the problem is surface dirt or deeper oxidation. Avoid using rough brushes or household cleaning powders because they can scratch the plastic. If the lens remains yellow or cloudy after cleaning, you may need a headlight restoration kit.
Step 3: Restore Cloudy or Yellow Headlights
Use a headlight restoration kit designed for plastic lenses. Most kits include sanding materials, polishing compound, and a protective coating. Cover the surrounding paint with masking tape to prevent accidental scratches.
Follow the kit's instructions carefully. Some restoration methods require wet sanding with different grades of sandpaper to remove the damaged outer layer. After sanding, apply the polishing compound to improve clarity.
Finish with a UV-resistant coating to protect the restored lens from sunlight. This final step is especially important in the UAE, where strong UV exposure can cause the lens to become cloudy again.
Step 4: Replace a Faulty Headlight Bulb
If a headlight is not working, check the bulb first. Consult the owner's manual to identify the correct bulb type and removal process. Some vehicles provide easy access from behind the headlight, while others require removing covers or other parts.
Switch off the lights and allow the bulb to cool. Remove the old bulb carefully and install a compatible replacement. Avoid touching the glass of halogen bulbs with bare fingers, as oil from the skin can shorten their life. Make sure the bulb is fitted correctly and its connector is secure. Test the headlight before closing the bonnet.
Step 5: Check the Wiring and Electrical Connections
If replacing the bulb does not solve the problem, inspect the accessible electrical connections. Look for loose connectors, damaged insulation, corrosion, or signs of overheating.
A blown fuse may also stop a headlight from working. Check the owner's manual to find the correct fuse and use the specified replacement rating. Never install a fuse with a higher rating to stop it from blowing.
If the new fuse fails again or the wiring looks damaged, get the electrical system inspected by a professional technician. Incorrect electrical repairs can create short circuits and further damage.
Step 6: Fix Headlight Moisture Problems
If you notice moisture inside the headlight, check the lens, housing, seals, and ventilation points. Small amounts of temporary condensation may clear on their own. However, repeated condensation or standing water suggests a problem that needs attention.
A technician may need to replace a damaged seal, repair a crack, or correct a blocked vent. If water has damaged the internal components, the entire headlight assembly may need replacement.
Do not drill holes into the headlight or use high heat to dry it. These methods can damage the housing and affect its weather protection.
Step 7: Test the Headlights and Check Their Alignment
After completing the repair, switch on the headlights and check both low and high beams. Make sure the lights are steady and have similar brightness. Check the indicators and daytime running lights too, if they are part of the same assembly.
Headlight alignment is equally important. Lights that point too low can reduce visibility, while lights aimed too high can disturb other drivers. If the headlight assembly has been removed or replaced, have its beam alignment checked using the correct equipment. Proper alignment helps provide a clear view of the road without causing glare.
How to Prevent Headlight Damage in the UAE
Preventing headlight damage is easier and often less expensive than replacing the entire assembly. Regular cleaning and protection can help maintain clear lenses and reliable lighting, particularly in the UAE's hot and dusty conditions.
Follow these simple tips to keep your headlights in good condition:
- Use UV protection: Apply a suitable UV-resistant coating after restoring the lenses.
- Clean regularly: Remove sand, dust, and dirt using a soft microfiber cloth.
- Park in shaded areas: Use covered parking whenever possible to reduce direct sunlight exposure.
- Inspect the seals: Check for cracks, gaps, or moisture around the headlight housing.
- Replace weak bulbs: Change bulbs when their brightness drops or they begin to flicker.
- Avoid rough cleaning materials: Do not use abrasive pads that can scratch the lens.
- Check the lights regularly: Test all headlights before long trips and night drives.
These habits can help reduce wear and maintain good visibility throughout the year.
When Should You Replace Car Headlights?
Not every headlight problem can be fixed with a simple repair. If the lens is severely cracked, the housing is broken, or the internal reflectors are damaged, replacing the assembly may be necessary.
You should consider headlight replacement when:
- The lens has deep cracks that allow water to enter.
- The reflector has become damaged or burnt.
- The headlight remains very dim after replacing the bulb.
- Moisture repeatedly enters the assembly despite seal repairs.
- The mounting points are broken, and the headlight cannot stay in position.
Modern vehicles may have LED or adaptive headlights with complex electronic parts. These systems can be expensive and require specialist tools. A professional inspection can help determine whether repair or replacement is more suitable.
How Much Does Headlight Repair Cost in the UAE?
The cost of headlight repair in the UAE depends on the type of damage, vehicle model, and repair method. Cleaning and polishing cloudy lenses generally costs less than replacing a complete headlight assembly.
Bulb replacement is often relatively affordable, but premium LED and adaptive lighting systems can cost much more. Electrical repairs, damaged wiring, and moisture-related problems also have different costs depending on the parts and labour required.
Before approving any work, ask the workshop to inspect the headlights and provide a clear estimate. If your car has expensive lighting technology, check whether the faulty component can be repaired instead of replacing the entire unit.
Why Proper Headlight Maintenance Matters for UAE Drivers
Headlights help drivers see road signs, pedestrians, road markings, and other vehicles in low-light conditions. Clear lenses and correctly aimed beams are especially important when driving on highways, poorly lit roads, or during dusty weather.
In the UAE, sandstorms, fog, and sudden changes in visibility can make driving more difficult. Damaged or dim headlights may reduce the distance you can see clearly. They can also make your vehicle less visible to other road users.
Regular headlight maintenance helps maintain proper lighting performance and supports safer driving. It also allows you to detect small problems before they develop into costly repairs.
Conclusion
Repairing car headlights in the UAE starts with identifying the actual problem. Cloudy lenses may need polishing and UV protection, while faulty bulbs require the correct replacement. Damaged wiring, broken housings, and water inside the assembly may need professional attention.
Regular cleaning, shaded parking, and proper maintenance can help protect headlights from strong sunlight, dust, and heat. If your headlights remain dim, flicker, or show signs of serious damage, get them inspected instead of delaying repairs.
Need professional car headlight repair services in the UAE? Contact 800Sayara for expert vehicle inspection, electrical repairs, and general car maintenance. Its technicians can help identify headlight problems and recommend suitable solutions to keep your vehicle safe and road-ready.
Need a trusted garage in the UAE?
Book expert car service with 800Sayara in Dubai, Abu Dhabi and Sharjah.
Book Appointment