How to Repair a Car Dashboard Crack in the UAE?
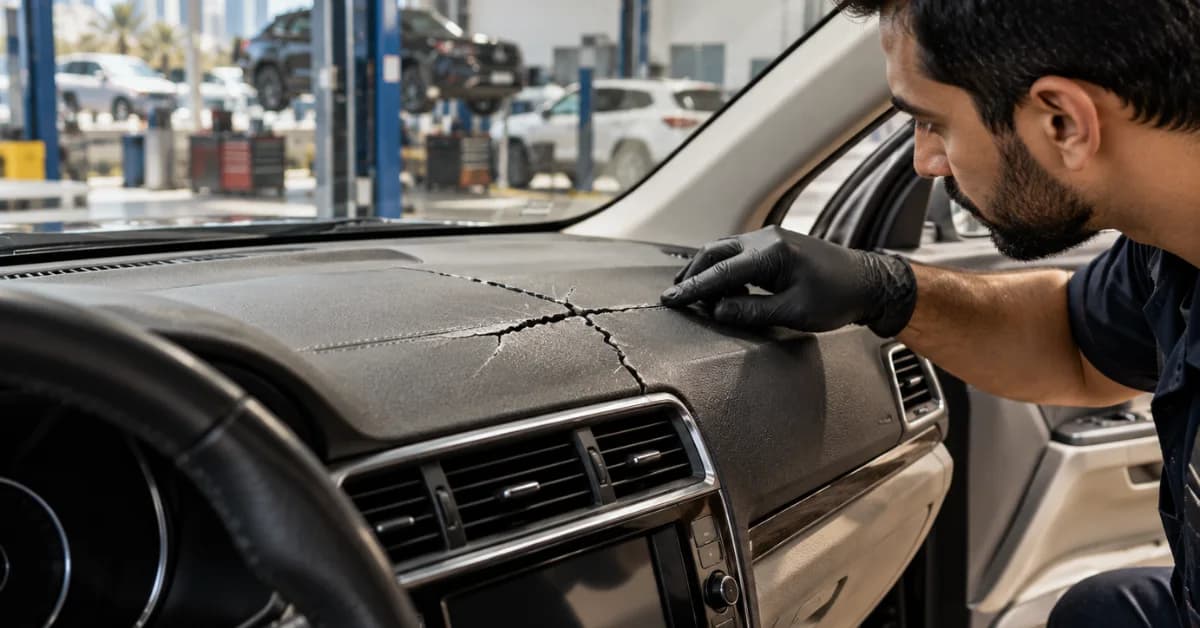
The UAE's hot weather can be tough on car interiors. Long hours under direct sunlight can cause dashboard materials to dry out, fade, and develop cracks. What starts as a small line on the dashboard can become a bigger problem if left untreated.
To repair a car dashboard crack, first park the vehicle in a shaded area and let the dashboard cool down. Clean the cracked surface to remove dust, oil, and dirt. Choose a suitable dashboard repair kit or filler based on the dashboard material.
Apply the repair product carefully, smooth the surface, and allow it to dry as directed. Finally, use a suitable dashboard protectant to help prevent further damage.
The right repair method depends on the size, depth, and location of the crack. Small surface cracks may be fixed at home, while deep cracks or badly damaged dashboards may require professional repair or replacement. Understanding the repair process can help keep your car interior in good condition and maintain its appearance.
Why Do Car Dashboards Crack in the UAE?
Extreme heat and strong sunlight are two major reasons car dashboards crack in the UAE. Most dashboards are made from plastic, vinyl, leather, or soft-touch materials.
Continuous exposure to ultraviolet (UV) rays and high temperatures can cause these materials to lose moisture, become brittle, and shrink.
Temperature changes also affect dashboard materials. A car parked in direct sunlight can become extremely hot inside.
When the dashboard repeatedly heats up and cools down, the material expands and contracts. Over time, this movement can create small cracks that gradually become wider.
Other common causes include:
- UV exposure: Sunlight can break down the surface of dashboard materials.
- Age: Older dashboards may become dry and lose flexibility.
- Poor maintenance: Lack of cleaning and protection can speed up surface damage.
- Low-quality materials: Some dashboard materials are more sensitive to heat and sunlight.
- Previous repairs: Poor repair work may weaken the surface and cause cracks to return.
Regular interior care and protection can slow down dashboard damage, especially in hot climates.
How to Identify Different Types of Dashboard Cracks?
Before repairing a dashboard, it is important to understand the type of damage. Not all cracks require the same repair method. A small surface crack may only affect the top layer, while a deep crack can extend into the dashboard's inner structure.
Small Surface Cracks
Small surface cracks often appear as thin lines on the dashboard. They may be caused by UV exposure, dry materials, or repeated temperature changes. These cracks are usually easier to repair because the damage has not spread deeply into the dashboard.
A suitable dashboard filler or repair compound may restore the surface and reduce the visibility of the crack. However, the result depends on the material, colour, and condition of the dashboard. If the material around the crack is brittle, the damage may spread again without proper protection.
Deep Dashboard Cracks
Deep cracks are wider and may extend through several layers of the dashboard. They can appear after years of exposure to intense sunlight or when the dashboard material becomes very weak.
These cracks often need a stronger repair method, such as a flexible filler, backing material, or professional dashboard restoration. Simply applying a surface coating may hide the crack for a short time but will not provide lasting support. If the dashboard is badly damaged, replacement may be a more suitable option.
Cracks Near Air Vents or Dashboard Edges
Cracks around air vents, speaker openings, and dashboard edges can be difficult to repair. These areas have curves, openings, and narrow sections that make it harder to apply filler evenly.
Damage near the passenger airbag area requires extra care. Do not apply filler, glue, or other repair products over airbag covers or their deployment seams.
Incorrect repairs in these areas can affect safety. A professional should inspect any crack that is close to an airbag or important dashboard component.
Tools and Materials Needed to Repair a Dashboard Crack
Having the right materials makes dashboard repair easier and helps create a smooth finish. Before starting, check the dashboard material and choose products that are suitable for it. Using the wrong adhesive or filler can cause discolouration, hard patches, or more damage.
Here are some useful items for a basic repair:
- Dashboard repair kit: Contains products designed to fill and cover certain types of cracks.
- Plastic or vinyl filler: Helps fill gaps and restore damaged surfaces, depending on the material.
- Microfiber cloth: Removes dust and dirt without scratching the dashboard.
- Mild interior cleaner: Cleans the surface before applying repair products.
- Fine sandpaper: Helps smooth suitable repair compounds after they have cured.
- Colour-matching dye: Helps blend the repaired area with the original dashboard.
- UV protectant: Helps reduce damage from sunlight after the repair.
Always follow the product instructions. Some dashboards have textured or soft-touch finishes that can be damaged by sanding or strong cleaning products.
How to Repair a Car Dashboard Crack Step by Step
Repairing a cracked dashboard requires patience and attention to detail. The goal is to fill the damaged area, restore the surface, and make the repair blend with the rest of the dashboard. Small cracks are generally more suitable for DIY repairs, while large or deep cracks may need professional attention.
Step 1: Park the Car in a Shaded Area
Start by parking your car in a shaded and well-ventilated area. Allow the dashboard to cool before touching it or applying any repair product. High temperatures can make fillers and adhesives dry too quickly or affect how they bond with the surface.
Avoid working in direct sunlight, especially during the UAE summer. A cool surface makes it easier to clean the dashboard and apply repair materials evenly. Make sure the engine is switched off and that the vehicle is parked safely before beginning the repair.
Step 2: Clean the Cracked Area
Use a mild interior cleaner and a microfiber cloth to remove dust, dirt, and oily marks around the crack. Clean the damaged area carefully without soaking the dashboard. Allow it to dry completely before applying any filler or adhesive.
A clean surface helps repair products bond properly. Dirt trapped inside the crack can weaken the repair and create an uneven finish.
Avoid using harsh chemicals, strong solvents, or household cleaning products unless the dashboard manufacturer confirms they are safe for the material.
Step 3: Prepare the Crack
Check the crack carefully to understand its depth and width. Some repair kits require the damaged area to be lightly prepared before applying the filler. Follow the instructions provided with your selected product.
If the kit requires sanding, use only the recommended abrasive and avoid removing too much material. Excessive sanding can damage the dashboard texture or make the crack wider.
Do not cut into the dashboard or attempt to access internal components, especially near airbags, wiring, or electronic systems.
Step 4: Apply the Dashboard Repair Filler
Choose a flexible filler or repair compound designed for your dashboard material. Apply a small amount into the crack using the tool supplied with the kit. Work carefully to fill the damaged area without spreading too much product over the surrounding surface.
For deeper cracks, some kits require a backing material or several thin layers of filler. Follow the manufacturer's directions rather than filling a deep gap with one thick layer. The right method can help reduce shrinkage and improve the strength of the repair.
Step 5: Smooth and Shape the Repaired Area
Once the filler has been applied, shape it to match the dashboard surface. Some products can be smoothed while wet, while others must cure before they can be sanded or shaped.
Pay attention to the dashboard's original texture. A completely smooth patch on a textured dashboard may stand out even if the crack is filled properly. Use the tools and texture pads supplied with the repair kit when available.
Avoid sanding areas that contain soft-touch coatings or delicate surface finishes unless the product instructions specifically allow it.
Step 6: Match the Dashboard Colour
Colour matching is an important part of dashboard restoration. Even a strong repair can look poor if the filler is much lighter or darker than the original material.
Use a compatible dashboard dye or colour coating recommended for your repair kit. Test the colour on a hidden area if the product instructions allow it.
Apply thin, even layers rather than one heavy coat. Allow each layer to dry as directed. Keep the product away from airbag covers, buttons, screens, and other electronic controls.
Step 7: Allow the Repair to Cure
After finishing the repair, leave the dashboard untouched for the recommended curing time. Avoid placing objects on the repaired area or exposing it to extreme heat before the product has fully cured.
Curing time varies depending on the filler, adhesive, coating, and surrounding temperature. Do not rush the process by using a hair dryer or parking the car in direct sunlight. Once the repair has cured, inspect the surface for gaps, rough edges, or visible colour differences.
How to Prevent Dashboard Cracks in the UAE?
Repairing a cracked dashboard is only part of the solution. Protecting the dashboard from heat and sunlight helps prevent new cracks and reduces the risk of existing damage getting worse. This is especially important in the UAE, where cars can remain exposed to intense sunlight for several hours.
Follow these simple tips to protect your car interior:
- Use a sunshade: Place a reflective windscreen sunshade when parking outdoors to reduce direct sunlight.
- Park in covered areas: Choose shaded parking or covered spaces whenever possible.
- Apply UV protection: Use a dashboard protectant designed for your dashboard material.
- Clean regularly: Remove dust and dirt with a suitable interior cleaner.
- Avoid harsh chemicals: Strong cleaners can dry out or damage dashboard surfaces.
- Check for early damage: Repair small cracks before they spread and become more difficult to fix.
These habits can help maintain your dashboard's appearance and reduce the effects of long-term heat exposure.
DIY Dashboard Repair vs Professional Repair
Choosing between DIY and professional repair depends on the condition of the dashboard. A small surface crack may be suitable for a repair kit, but larger damage can require specialist tools and materials.
| DIY Dashboard Repair | Professional Dashboard Repair |
|---|---|
| Suitable for small surface cracks | Suitable for deep and large cracks |
| Lower initial cost | Higher cost depending on damage |
| Requires basic tools and patience | Uses specialist repair tools and materials |
| Results depend on personal skill | Offers access to professional restoration methods |
| May not match the original texture perfectly | Can provide more precise colour and texture matching |
| Not suitable for airbag-related damage | Allows proper inspection of complex or safety-related damage |
If your dashboard has several cracks, loose sections, or damage near an airbag, professional inspection is the safer option. A technician can determine whether restoration is possible or if dashboard replacement is needed.
How Much Does Car Dashboard Crack Repair Cost in the UAE?
The cost of dashboard crack repair in the UAE depends on the size of the crack, the dashboard material, and the repair method. Small surface repairs may cost less because they require fewer materials and less labour. Deep cracks, damaged dashboard panels, and professional restoration can cost significantly more.
The type of vehicle also affects the price. Luxury cars may have special dashboard materials, complex designs, or integrated electronic components that make repairs more demanding.
Before starting the work, ask for an inspection and a repair estimate. If the dashboard has extensive damage, compare the cost of professional restoration with replacement. This helps you choose a solution based on the vehicle's condition and your budget.
When Should You Replace a Cracked Dashboard?
Not every dashboard crack can be repaired successfully. If the dashboard has large gaps, broken sections, severe warping, or widespread material damage, replacement may be a more suitable option.
Replacement may also be necessary if the dashboard's structure is damaged or if a previous repair has failed several times. Cracks around airbag deployment areas need special attention because incorrect repairs can interfere with safety systems.
A professional car service center can inspect the dashboard and check whether the damage affects internal components. For older vehicles, restoration may still be possible, but the condition of the material and availability of replacement parts will influence the decision.
Conclusion
A cracked dashboard can affect the appearance and condition of your car's interior, especially in the UAE's hot climate. Small cracks may be repaired using a suitable filler and colour-matching product, while more serious damage often requires professional restoration.
Cleaning the surface, choosing the right materials, and allowing enough curing time are important for a lasting result.
Regular cleaning, UV protection, sunshades, and covered parking can help prevent future cracks. If the dashboard has severe damage or cracks near safety components, professional inspection is essential.
Need help maintaining your car in the UAE? Contact 800Sayara for professional car repair and maintenance services. Its experienced technicians can help inspect your vehicle, identify interior and mechanical issues, and recommend suitable solutions to keep your car in good condition.
Need a trusted garage in the UAE?
Book expert car service with 800Sayara in Dubai, Abu Dhabi and Sharjah.
Book Appointment